How to make a cheap,simple transfer machine for VdW heterostructures assembly
реклама
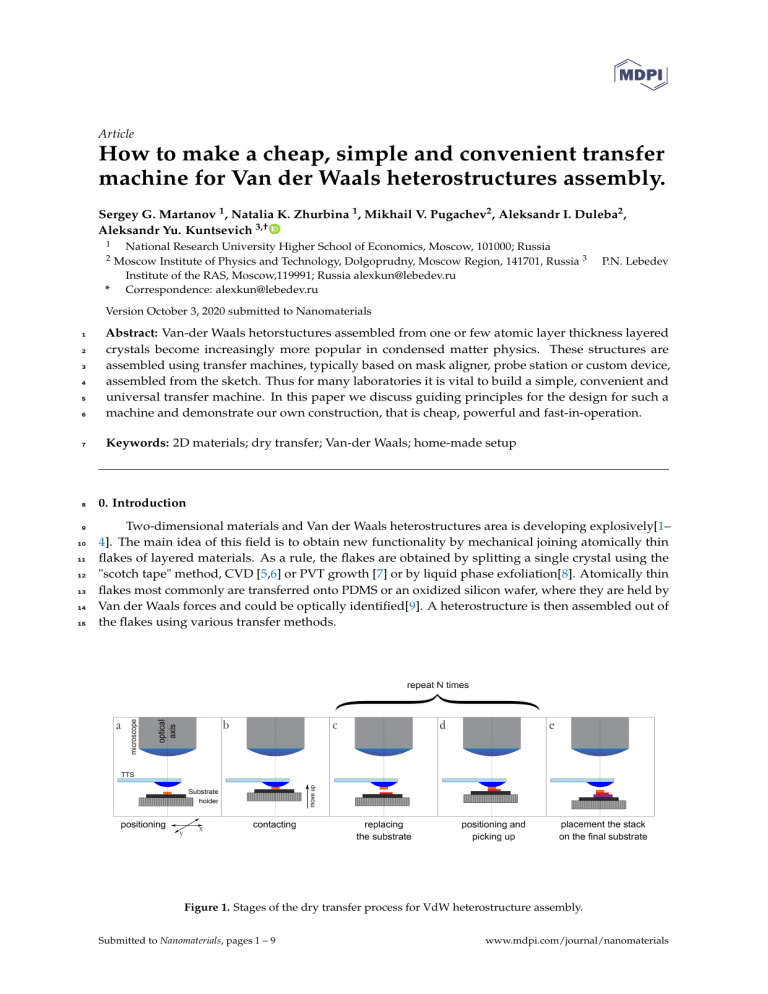
Article How to make a cheap, simple and convenient transfer machine for Van der Waals heterostructures assembly. Sergey G. Martanov 1 , Natalia K. Zhurbina 1 , Mikhail V. Pugachev2 , Aleksandr I. Duleba2 , Aleksandr Yu. Kuntsevich 3,† 1 National Research University Higher School of Economics, Moscow, 101000; Russia Moscow Institute of Physics and Technology, Dolgoprudny, Moscow Region, 141701, Russia 3 Institute of the RAS, Moscow,119991; Russia alexkun@lebedev.ru * Correspondence: alexkun@lebedev.ru 2 P.N. Lebedev Version October 3, 2020 submitted to Nanomaterials 6 Abstract: Van-der Waals hetorstuctures assembled from one or few atomic layer thickness layered crystals become increasingly more popular in condensed matter physics. These structures are assembled using transfer machines, typically based on mask aligner, probe station or custom device, assembled from the sketch. Thus for many laboratories it is vital to build a simple, convenient and universal transfer machine. In this paper we discuss guiding principles for the design for such a machine and demonstrate our own construction, that is cheap, powerful and fast-in-operation. 7 Keywords: 2D materials; dry transfer; Van-der Waals; home-made setup 1 2 3 4 5 8 9 10 11 12 13 14 15 0. Introduction Two-dimensional materials and Van der Waals heterostructures area is developing explosively[1– 4]. The main idea of this field is to obtain new functionality by mechanical joining atomically thin flakes of layered materials. As a rule, the flakes are obtained by splitting a single crystal using the "scotch tape" method, CVD [5,6] or PVT growth [7] or by liquid phase exfoliation[8]. Atomically thin flakes most commonly are transferred onto PDMS or an oxidized silicon wafer, where they are held by Van der Waals forces and could be optically identified[9]. A heterostructure is then assembled out of the flakes using various transfer methods. Figure 1. Stages of the dry transfer process for VdW heterostructure assembly. Submitted to Nanomaterials, pages 1 – 9 www.mdpi.com/journal/nanomaterials Version October 3, 2020 submitted to Nanomaterials 16 17 18 19 20 21 22 23 24 25 26 27 28 29 30 31 32 33 34 35 36 37 38 39 40 2 of 9 The fragility of the flakes and the tendency to form wrinkles led to development of different methods of dry [10–16] and wet transfer [17–20], see also [21] for review. Dry transfer methods have become much more common because of their convenience. They are carried out using transparent temporary substrates (TTS), sometimes called stamps. For dry transfer, a piece or a drop of viscoelastic transparent material, as a rule poly-dimethysiloxane (PDMS), is placed on the surface of the slide. Then, using a spinner, the drop is covered with a gluing compound, usually PPC (polypropylene carbonate) [14,15] polycarbonate [12]), PMMA [10,16] or polyvililchloride (PVC)[22]). The adhesive properties of these polymers vary with temperature. The transfer typically proceeds as follows: The substrate with the flakes is fixed on a substrate holder (SH). It is positioned in microscope field of view and at a certain temperature (about 40◦ C for PPC [14]) the stamp touches a desirable flake on a substrate (see Figure 1a). The flake stick to the surface of the drop. Then the drop with the flake is lifted (see Figure 1b). Next, the substrate is replaced with the next one containing the other flake (see Figure 1c). The operator positions the TTS relative to substrate in a way that the previously collected flake overlaps with a new desired one (see Figure 1d). This operation is repeated several times until a whole stack is collected on the drop. Then the stack is transferred onto a final substrate (see Figure 1e). The temperature is set high to make the glue more liquid, the droplet is raised and the sample peels off, remaining on a substrate surface. To carry out these heating and positioning operations, a transfer machine is required. Mask aligners, e.g. like in Ref.[23] have all the required positioning functions. There are also several reports of home-made machines [10,12,24–27] from the simplest for k$ [25] with limited functionality, to fully robotic for 1 M$ [26]. Such mashines are now produced commercially e.g. by HQGraphene and Creative Devices. Laboratories are often faced the task of building such a machine within quite a limited budget and time. Despite several reviews on transfer processes [4,21,28], we did not find a description of the basic guiding opto-electro-mechanical principles those would help to avoid mistakes and assemble a powerful and cheap machine. This paper aims to fill this gap. Figure 2. (a) Schematics of the transfer machine (b) photo of our machine. 41 1. Device design and guiding principles Any transfer machine should necessarily contain three main components, shown in Figure 2a: 42 43 44 1. 2. Substrate holder TTS holder Version October 3, 2020 submitted to Nanomaterials 45 3. 3 of 9 Microscope 51 We describe below requirements to each of them using our own home-made transfer machine as an example. Note that for a focusing, the machine should be rigid and unaffected by vibrations, therefore it should be placed onto an optical plate. Moreover, single basement allows relocation of the transfer machine as a whole into the glove-box to operate with materials those are unstable at ambient conditions. In our machine we used a 200×300 mm2 anodized aluminum plate with an array of M6 screwholes equipped with rubber legs. 52 1.1. Microscope 46 47 48 49 50 53 54 55 56 57 58 59 60 61 62 63 64 65 66 67 68 69 70 71 72 73 74 75 76 77 78 79 80 The operator needs to have a good view of the working area (typically 100x100 µm2 -20x Plan objective) during the transfer process. Therefore, the device must contain a microscope. To find the flakes on a substrate a lens with smaller magnification is needed (field of view more than 500x500 µm2 - 5x Plan objective). It is also desirable to inspect the wafers with high magnification (field of view below than 50x50 µm2 - 50x Plan Objective). The objectives should have large working distance to avoid touching the glass (more than 4 mm) and should be placed on the revolver head. Exactly this set of objectives is realized in the top class laboratory [27,29] and commercial [HQGraphene] transfer machines. Note that the high-magnification objective is useless for transfer, because its depth of focus is too small, that makes it impossible due to TTS to have all field of view focused. Moreover it is time consuming to find focus with high-magnification objective. The microscope should be equipped with fast (more than 30 fps) and high resolution (more than 20 MP) camera for real-time monitoring and taking photos of all stages of the process. Such a camera is now inexpensive, below 100 $, it can be connected to PC or monitor. Binoculars are convenient and very useful for adjustment purpose, however they hardly could be applied in the glovebox. Since the substrate is generally not transparent, the illumination should be fed through the objective. Most of high-magnification microscopes have stationary objectives attached to heavy base. However, for transfer machines it is necessary to move TSS and substrate holder with respect to each other focusing alternately on both of them. It is vital therefore to have objective height adjustable. There are not so many commercially available metallurgical microscopes with the revolver head and objective movable in z−direction. The models by e.g. Zeiss and Olympus are superior in quality but pretty expensive (several 10 k$). Recently there appeared much more available microscopes ICM-100 (China, 1.5 k$) and Radical (India, 400$). The last one was used in our setup. Besides the price its advantage is small size, that will allow a subsequent placement into the glove-box, similarly to this machine. Large working-distance objectives for this microscope were purchased separately here. A disadvantage of this microscope is not very precise coincidence of axes of the revolver head objective slots. A microscope with a single objective and zoom, like this one may also be considered as an option, as in Ref.[25]. Note that zoom adjustment automatically de-focus the microscope. 81 82 83 84 85 86 87 88 89 90 91 92 1.2. Transparent temporary substrate holder The function of this part is to hold the glass slide with a drop/stamp. The glass should be fixed by the clips in the space between the sample and the microscope. Atomically thin flakes are practically invisible on TTS, therefore, when creating stacks, the microscope and TTS holder should remain mutually immobile, while the substrates with flakes should be movable and easily changeable, otherwise the stack on TTS could be lost. However, before the transfer, the center of the stamp or PDMS drop should be located close to the optical axis and its top should placed in the microscope focus. Thus, TTS holder should have at least two degrees of freedom along the x and y axes. If the microscope has a stationary objective, then TTS holder must also have z-degree of freedom. There are many options for the design of the TTS holder. For example, a manipulator from the probe-station Version October 3, 2020 submitted to Nanomaterials 93 94 4 of 9 might be used for this purpose[14], like this one. In the model by HQGraphene the glass might additionally be deflected from the horizontal orientation using a corresponding goniometer. Figure 3. Problem of too small glass slide (a) and its possible solutions: (b) using large glass e.g. like in mask aligner; (c) making a small sample holder table; (d) gluing a glass slide or stamp to the end of the other slide. 105 We have used XYZ-linear stage and attached a glass slide using the cheeseplates for photography. The main challenge with the TTS holder is illustrated in Figure 3a. Standard glass slides are rather short (≈ 76mm). In order to spin-coat the PDMS drop with PPC, the drop should be located in the center of the glass. Typically the radius of the SH table exceeds half of the glass slide length (∼ 3 cm), and the table touches the clamp, that is not acceptable. There are some approaches to overcome this issue, illustrated in Figure 3b-d. If a piece of glass is taken large, it can be safely positioned as it is in mask-aligner based machines[23] (Figure 3b). The table size could also be minimized (Figure 3c), for example in our machine the diameter of the table is less than 6 cm, so the stamp fits the center of the table. Most commonly, the stamp is either relocated to the end of the glass slide or to another glass slide [27,29] that is glued to the bottom of the holder, as shown in Figure 3d. The combination of these approaches is also possible. 106 1.3. Substrate holder 95 96 97 98 99 100 101 102 103 104 107 108 109 110 111 112 113 114 115 116 117 118 Substrate holder should allow positioning with µm resolution along the x,y, and z directions. It is also necessary to rotate the substrate in the horizontal plane with a fractions of a degree precision, that is crucial e.g. for creating the magic-angle structures[30]. Corresponding manipulators are available commercially and relatively cheap ( $ 200). Note that all manual motion and rotation stages could be upgraded to the motorized ones, that is useful for glovebox operation and helps to avoid vibrations[27]. The Van der Waals stack on the TTS during the assembly should be located near the optical axis and should not move laterally, otherwise it might be lost. Therefore, it is necessary to remove the substrate holder, replace the substrate and return the holder to exactly the same place without displacement of the stack. In Ref. [25] a magnetic base was proposed for that. It is more reproducible to place the manipulator on a single-axis slide with a locking screw, like this one. Such a slide allows to change a substrate in a few seconds (see Supplementary Video). Version October 3, 2020 submitted to Nanomaterials 119 120 121 122 123 124 125 126 127 128 129 130 131 132 133 134 135 136 137 138 139 5 of 9 The substrate is placed on the table, i.e the top plane of the substrate holder, that is attached to the manipulator. The dry transfer pick-up process is based on sensitivity of the polymer to temperature. So the table should contain a heating element and a thermometer. It is also necessary to seal the substrate. Entry-level solution is fixing the substrate with glue or double-sided scotch-tape. The obvious disadvantages are contamination of the substrate, and in the case of glue, a long waiting time. Moreover the glue might become unstable with temperature. The fastest and most convenient sealing is vacuum suction of the substrate. The heating table should therefore have the following components: 1. A vacuumed holder with metallic polished top plate with a hole for reliable vacuum fixation of the the substrate. 2. A heater to change the sample temperature 3. A thermocouple to control these changes. Commercially available heated vacuum chucks are expensive and massive, see e.g. here and here. Making a customised one in a mechanic workshop from the sketch might be time consuming. We suggest here making a cheap and compact one out of commercially available PC Motherboard Bridge waterblock as shown in Figures 4a,b. We place a heater and a thermocouple inside a chamber of the waterblock and drill a hole in the center of the copper plate for vacuum sealing of the substrate. Heater and thermocouple wires pass through one the water entrances and 90◦ adaptors and are sealed hermetically. In order to make a path for vacuum above the heater a groove was milled to the pumping hole, as shown in Figure 4a. The tube for vacuum pumping passes through the second water entrance. Figure 4. (a) Schematics of the substrate holder, a.1 pumping trench, a.2 sealing, (b) photo of the substrate holder, (c) photo of our electronic box 140 141 142 143 144 145 146 147 148 149 All electronic components for the table operation are placed into a box shown in Figure 4c. We use a cheap (∼2$) aquarium diaphragm pump for vacuum and standard PID-controller to measure the temperature. One common mobile phone AC/DC adaptor (5V, 2A) is used for both pump and PID-controller. The pump has a switch on the front panel. We use the laboratory power source (0-32V, 0-5A by Gophert) for the heater instead of PID-controller, since the latter is too slow due to thermal inertia of the table. Using a computer control similarly to HQGraphene machine makes the process faster and more controllable and probably makes sense if the mass production of the Van der Waals heterostructures is required. Such automatization is not required for a small scientific group with limited measurement facilities where the bottleneck is time-consuming stamp preparation, exfoliation and search. Version October 3, 2020 submitted to Nanomaterials 150 6 of 9 2. Examples of operation Figure 5. (a) Schematics of the substrate holder, a.1 pumping trench, a.2 sealing, (b) photo of the substrate holder, (c) photo of our electronic box 167 Figure 5 shows examples of the systems assembled with the aid of our setup using the standard PPC on PDMS drop route, similar to Ref.[14]. An approximately 50 nm thick flake of Srx Bi2 Se3 was obtained by scotch tape exfoliation onto an oxidized Si wafer of the single crystal, the growth and characterization of which are described in Refs. [31,32]. The photography of the flake was taken (see Figure 5a) and the corresponding 30 nm thick gold electrodes with contact pads were patterned on a fresh oxidized Si wafer using photolitography with laser pattern generator Heidelberg muPG101, gold evaporation and a standard lift-off process (see Figure 5b). We locate the flake with a drop, collect it onto a TTS, change a substrate and find the contact electrodes. Figures 5c and 5d show the flake with the contacts before and after the peel off, respectively. The whole transfer process took about 5 minutes. Figure 5e-h shows a Van der Waals heterostructure boron nitride / monolayer MoS2 / boron nitride. We used natural mineral molybdenite and commercially available hexagonal boron nitride. Boron nitride was scotch-tape exfoliated onto an oxidized Si wafer (285 nm oxide thickness). To extract MoS2 monolayer we used gold layer, similarly to Ref. [ADD]. In order to locate the flakes we exfoliate them onto an array of markers. Figure 5 shows all elements and the assembly. The whole transfer process starting from the insulating flakes took about 15 minutes. In the Supplementary Video the transfer process is shown. 168 3. Discussion: advantages, limitations, further improvements 151 152 153 154 155 156 157 158 159 160 161 162 163 164 165 166 169 170 171 172 173 174 175 176 177 It should be noted that the suggested machine uses all the design principles implemented in top-level transfer machines, such as: 1. Independent and precise positioning of all three components of the machine. 2. Presence of lenses with different magnification for transfer, location and analysis. 3. Vacuum chuck and temperature control on the substrate holder. Moreover this design has some advantages: 1. Compact size for easy integration into a glovebox; 2. Low cost, about $ 1k for all components; 3. Modular design of the device; Version October 3, 2020 submitted to Nanomaterials 178 179 180 181 182 183 184 185 186 187 188 189 190 191 192 193 194 195 196 197 198 199 200 201 202 203 204 205 206 207 208 209 210 211 7 of 9 4. Cheap and compact substrate holder table. 5. Convenient substrate replacement without touching the TTS holder and the microscope. Some other technical aspects also should be discussed: • Vacuum sealing of the substrate is never perfect, there is some air underflow that cools the sample down making a thermometer misleading. This effect should be taken into account. • It is highly desirable not to lose a focus during the substrate positioninig and rotation. Therefore the sample holder table plane and microscope plane of view should be parallel and aligned perpendicular to the rotational axis of the holder. The latter axis should be rather close to the optical axis, otherwise it will take extra time to find the flakes after the rotation. • The construction by HQGraphene is a bit different from the one considered in this paper as its xy-manipulator (TTS Holder) is placed onto another bigger manipulator (substrate holder). Such a placement is potentially a fruitful idea, as it suppresses mutual vibrations of the substrate and TTS and can help to avoid extra degrees of freedom. • Note that the machine is assembled from very cheap components because there is no need in sub-micrometer resolution positioning. For our machine we estimate the precision of flakes alignment as 2 micrometers, that comes from diffraction limit of the microscope, vibrations and viscoelastic properties of PDMS, those lead to slight shift of flakes in the process of TTS-to-substrate contact. • The transfer with the optimized machine might be very fast and takes just a few minutes provided that the stamp is properly prepared. One drop op PDMS might be used many times. However, sometimes the transfer might be unsuccsessfull. This is because there are hidden controlling parameters those crucially affect the properties of thermosensitive polymer, such as humidity, thickness of the polymer layer, freshness of the PDMS drop, preparation of the substrate surface etc. These parameters in turn determine the optimal temperature regime and should be maintained stable for a reproducible process. Seaching for flakes and controlling these parameters takes much more time than the transfer itself. • In Refs. [10,16] a Peltier element, like this one, is used instead of resistive heater. This element is faster, though it is not compatible with vacuum fixation, and the authors have to use double-sided scotch-tape. 4. Conclusions We demonstrate the guiding principles for assembly of cheap and multi-functional transfer machines for Van der Waals heterostructures taking our own machine as an example. There are many fruitful ideas that can help to improve such a machine. This paper aims to help those who want to enter the Van der Waals heterostructures field with maximal outcome per minimal expenses. 214 Author Contributions: S.G.M. and N.K.Z - methodology, visualization and writing the manuscript, M.V.P. and A.I.D. - [TO ADD], A.Y.K. - conceptualization, supervision. All authors have read and agreed to the published version of the manuscript. 215 Funding: The work is supported by Russian Foundation of Basic research (RFBR) Grant No. 18-32-20202. 216 Acknowledgments: The work was done in Shared Facility Center of the P.N. Lebedev Physical institute. 217 218 Conflicts of Interest: “The authors declare no conflict of interest. The funder had no role in the design of the study, the decision to publish the results; assembling the setup and writing of the manuscript. 219 Abbreviations 220 The following abbreviations are used in this manuscript: 212 213 221 Version October 3, 2020 submitted to Nanomaterials 222 SH TTS PVA CVD PPC PID PVC PMMA PC 8 of 9 Substrate holder Transparent temporay substrate Polyvinylalcohol chemical vapour deposition Poly-propilene carbonate Proportional-integral-differential (controller) poly-vinyl chloride poly-methyl meta acrylate personal computer 223 224 225 1. 2. 226 227 3. 228 229 4. 230 231 232 5. 233 234 6. 235 236 7. 237 238 8. 239 240 9. 241 242 10. 243 244 11. 245 246 247 248 12. 249 250 251 13. 252 253 254 14. 255 256 257 15. 258 259 260 16. 261 262 263 264 17. Geim, A.K.; Grigorieva, I.V. Van der Waals Heterostructures. Nature 2013, 499, 419–425. Novoselov, K.; Mishchenko, A.; Carvalho, A.; Castro Neto, A.H. 2D materials and van der Waals heterostructures. Science 2016, 353, aac9439. Li, J.; Chen, X.; Zhang, D.; Zhou, P. Van der Waals Heterostructure Based Field Effect Transistor Application. Crystals 2018, 8, 8. Frisenda, R.; Navarro-Moratalla, E.; Gant, P.; De Lara, D.P.; Jarillo-Herrero, P.; Gorbachev, R.V.; Castellanos-Gomez, A. Recent progress in the assembly of nanodevices and van der Waals heterostructures by deterministic placement of 2D materials. Chemical Society Reviews 2018, 47, 53–68. Shen, P.; Lin, Y.; Wang, H.; Park, J.; Leong, W.S.; Lu, A.; Palacios, T.; Kong, J. CVD Technology for 2-D Materials. IEEE Transactions on Electron Devices 2018, 65, 4040–4052. Cai, Z.; Liu, B.; Zou, X.; Chen, H.M. Chemical Vapor Deposition Growth and Applications of Two-Dimensional Materials and Their Heterostructures. Chemical Reviews 2018, 118, 6091–6133. Qi, H.; Wang, L.; Sun, J.; Long, Y.; Hu, P.; Liu, F.; He, X. Production Methods of Van der Waals Heterostructures Based on Transition Metal Dichalcogenides. Crystals 2018, 8, 35. Huo, C.; Yan, Z.; Song, X.; Zeng, H. 2D materials via liquid exfoliation: a review on fabrication and applications. Science Bulletin 2015, 60, 1994–2008. Blake, P.; Hill, E.W.; Castro Neto, A.H.; Novoselov, K.; Jiang, D.; Yang, R.; Booth, T.J.; Geim, A.K. Making graphene visible. Applied Physics Letters 2007, 91, 063124. Uwanno, T.; Hattori, Y.; Taniguchi, T.; Watanabe, K.; Nagashio, K. Fully dry PMMA transfer of graphene on h-BN using a heating/cooling system. 2D Materials 2015, 2(4), 041002. Kretinin, A.V.; Cao, Y.; Tu, J.S.; Yu, G.; Jalil, R.; Novoselov, K.; Haigh, S.J.; Gholinia, A.; Mishchenko, A.; Lozada, M.; Georgiou, T.; Woods, C.R.; Withers, F.; Blake, P.; Eda, G.; Wirsig, A.; Hucho, C.; Watanabe, K.; Taniguchi, T.; Geim, A.K.; Gorbachev, R. Electronic Properties of Graphene Encapsulated with Different Two-Dimensional Atomic Crystals. Nano Letters 2014, 14, 3270–3276. Zomer, P.; Guimarães, M.H.D.; Brant, J.C.; Tombros, N.; van Wees, B. Fast pick up technique for high quality heterostructures of bilayer graphene and hexagonal boron nitride. Applied Physics Letters 2014, 105, 013101. Castellanos-Gomez, A.; Buscema, M.; Molenaar, R.; Singh, V.; Janssen, L.; van der Zant, H.S.J.; Steele, G. Deterministic transfer of two-dimensional materials by all-dry viscoelastic stamping. 2D Materials 2014, 1, 011002. Pizzocchero, F.; Gammelgaard, L.; Jessen, B.; Caridad, J.; Wang, L.; Hone, J.; Bøggild, P.; Booth, T. The hot pick-up technique for batch assembly of van der Waals heterostructures. Nature Communications 2016, 7, 11894. Kinoshita, K.; Moriya, R.; Onodera, M.; Wakafuji, Y.; Masubuchi, S.; Watanabe, K.; Taniguchi, T.; Machida, T. Dry release transfer of graphene and few-layer h-BN by utilizing thermoplasticity of polypropylene carbonate. npj 2D Materials and Applications 2019, 3, 22. Toyoda, S.; Uwanno, T.; Taniguchi, T.; Watanabe, K.; Nagashio, K. Pinpoint pick-up and bubble-free assembly of 2D materials using PDMS/PMMA polymers with lens shapes. Appl. Phys. Express 2019, 12, 055008. Reina, A.; Son, H.; Jiao, L.; Fan, B.; Dresselhaus, M.S.; Liu, Z.; Kong, J. Transferring and Identification of Single- and Few-Layer Graphene on Arbitrary Substrates. J. Phys. Chem. C 2008, 112(46), 17741–17744. Version October 3, 2020 submitted to Nanomaterials 265 18. 266 267 19. 268 269 270 20. 271 272 21. 273 274 22. 275 276 23. 277 278 24. 279 280 281 25. 282 283 26. 284 285 286 27. 287 288 28. 289 290 29. 291 292 293 30. 294 295 31. 296 297 298 299 300 301 302 32. 9 of 9 Schneider, G.; Calado, V.; Zandbergen, H.; Vandersypen, L.; Dekker, C. Wedging Transfer of Nanostructures. Nano Letters 2010, 10,5, 1912–1916. Dean, C.R.; Young, A.F.; Meric, I.; Lee, C.; Wang, L.; Sorgenfrei, S.; Watanabe, K.; Taniguchi, T.; Kim, P.; Shepard, K.L.; Hone, J. Boron nitride substrates for high-quality graphene electronics. Nature Nanotechnology 2010, 5, 722726. Leong, W.; Wang, H.; Yeo, J.; Martin-Martinez, F.; Zubair, A.; Shen, P.C.; Mao, Y.; Palacios, T.; Buehler, M.; Hong, J.Y.; Kong, J. Paraffin-enabled graphene transfer. Nature Communications 2019, 10, 867. Fan, S.; Vu, Q.A.; Tran, M.D.; Adhikari, S.; Y.H., L. Transfer assembly for two-dimensional van der Waals heterostructures. 2D Materials 2020, 7, 022005. Wakafuji, Y.; Moriya, R.; Masubuchi, S.; Watanabe, K.; Taniguchi, T.; Machida, T. 3D Manipulation of 2D Materials Using Microdome Polymer. Nano Letters 2020, 20(4), 2486–2492. Jain, A.; Bharadwaj, P.; Heeg, S.; Parzefall, M.; Taniguchi, T.; Watanabe, K.; Novotny, L. Minimizing residues and strain in 2D materials transferred from PDMS. Nanotechnology 2018, 29, 265203. Kim, K.; Yankovitz, M.; Fallahazad, B.; Kang, S.; Movva, H.C.P.; Huang, S.; Larentis, S.; Corbet, C.M.; Taniguchi, T.; Watanabe, K.; Banerjee, S.; LeRoy, B.; E., T. Van der Waals Heterostructures with High Accuracy Rotational Alignment. Nano Letters 2016, 16, 1989–1995. Zhao, Q.; Wang, T.; Ryu, Y.K.; Frisenda, R.; Castellanos-Gomez, A. An inexpensive system for the deterministic transfer of 2D materials. Journal of Physics: Materials 2020, 3(1), 016001. Masubuchi, S.; Morimoto, S.; Onodera, M.; Asakawa, Y.; Watanabe, K.; Taniguchi, T.; Machida, T. Autonomous robotic searching and assembly of two-dimensional crystals to build van der Waals superlattices. Nature Communications 2018, 9, 1413. Boddison-Chouinard, J.; Plumadore, R.; Luican-Mayer, A. Fabricating van der Waals Heterostructures with Precise Rotational Alignment. Jove Journal of Visualized Experiments 2019, 149, e59727. Onodera, M.; Masubuchi, S.; Moriya, R.; Machida, T. Assembly of van der Waals heterostructures: exfoliation, searching, and stacking of 2D materials. Japanese Journal of Applied Physics 2020, 59, 010101. Iwasaki, T.; Endo, K.; Watanabe, E.; Tsuya, D.; Morita, Y.; Nakaharai, S.; Noguchi, Y.; Watanabe, K.; Taniguchi, T.; Moriyama, S. Bubble-Free Transfer Technique for High-Quality Graphene/Hexagonal Boron Nitride van der Waals Heterostructures. ACS Appl. Mater. Interfaces 2020, 12(7), 8533–8538. Cao, Y.; Fatemi, V.; Fang, S.; Watanade, K.; Taniguchi, T.; Kaxiras, E.; Jarillo-Herrero, P. Unconventional superconductivity in magic-angle graphene superlattices. Nature 2018, 556, 43–50. Kuntsevich, A.Y.; Bryzgalov, M.A.; Prudkoglyad, V.A.; Martovitskii, V.P.; Selivanov, Y.G.; Chizhevskii, E.G. Structural distortion behind the nematic superconductivity in Srx Bi2 Se3 . New Journal of Physics 2018, 20, 103022. Kuntsevich, A.Y.; Martovitskii, V.P.; Rybalchenko, G.V.; Selivanov, Y.G.; Bannikov, M.I.; Sobolevskiy, O.A.; Chigevskii, E.G. Superconductivity in Cu Co-Doped Srx Bi2 Se3 Single Crystals. Materials 2019, 12, 3899. c 2020 by the authors. Submitted to Nanomaterials for possible open access publication under the terms and conditions of the Creative Commons Attribution (CC BY) license (http://creativecommons.org/licenses/by/4.0/).
